


AUTOMATED SAMPLING
- IAQ Profile Monitor
- Mini IAQ Monitor
- Touch Screen IAQ Monitor
- i/fB
- PPMonitor Wall Unit
- Formaldemeter Htv-M
- Formaldemeter Htv
- Formaldemeter 400ST
- Formaldemeter Valve
- Field Calibration Kit
- instrument Desk Stand
- Instrument Wall Clamp
- AMS-2 Wall Mount
- AMS-2 External Sounder Module
- Extra Memory fro AMS-2
- 30dB Horn for AMS-2
- ConnBox
TOXIC GAS INSTRUMENTS
ACCESSORIES

Product Brochures
- htV-M brochure.pdf
- Formaldemeter htV Brochure.pdf
- IAQ Profile Monitor.pdf
- Mini IAQ Profile Monitor.pdf
- Touch Screen IAQ Profile Monitor.pdf
- ifB Brochure.pdf
- SAS Brochure.pdf
Technical Specifications
Compliance
If you have a problem with your instrument then maybe it's already been solved - check the questions below before getting in touch with us.
Instrument Questions
- After I re-calibrated the instrument it no longer clears and does not let me sample.
- I've been told that I need to reset my instrument. How do I do this?
- How often should the instrument be calibrated and can I check calibration drift?
- Why does the instrument take more time to 'settle' after taking larger samples?
- I've been told that my instrument might perform better in a different 'mode'. What does this mean?
- What do the different 'limit' settings do?
- Is there a way to make the sensor 'settle' quicker?
- The pump on my instrument has stuck or sounds 'rough' - can I do anything?
- How does the htV instrument convert from ppm to mg/m 3 ?
- My calibration standard has expired - can I still use it and how do I dispose of it?
- When I use the AMS-2 I get 'bAt' on the instrument screen but the battery is OK?
After I re-calibrated the instrument it no longer clears and does not let me sample. '----' is shown on the display all the time.
This can be caused by two problems: either a bad calibration standard was used or the sensor in the instrument has come to the end of it's life. Check the date on the calibration standard - has it expired? Also read the calibration procedure carefully. Either way you will need to clear wrong calibration from memory and revert to the default factory calibration. Once this is done re-try the calibration procedure - with a fresh calibration standard if necessary.I've been told that I need to 'reset' my instrument. How do I do this?
If your instrument has been calibrated incorrect or has been rendered unusable by incorrect settings being used then it will need to be reset. This will delete the calibration data and the instrument will have to be re-calibrated afterwards. Read the procedure below and make sure that you have understood each step before starting.- With the instrument turned off for at least two hours press and hold down both the left- and right-hand calibration buttons while turning the instrument on.
- You should see the word rSEt on the LCD. Release all the buttons.
- Wait for the display to cycle through to the 0.00 display.
- Turn the instrument off and then back on to complete the reset procedure.
- Confirm that a SEt ... CAL message is flashed on the screen.
This procedure is also available as part of this HowTo .
How often should the instrument be calibrated and can I check calibration drift?
Calibration frequency is not an issue that PPM Technology can advise you on - your Health & Safety procedures or equivalent should recommend a suitable scheme. However, many customers feel that the following helps them establish such schemes.Initially check - and correct if necessary - the calibration before each session (using the procedures below) and keep a record of the drift. Over time start to reduce the check frequency. In this way a feel for the drift can be obtained which will then determine the ideal calibration frequency.
Don't forget to check the calibration standard's date and that standard life-time is limited to 100 samples.
To check the calibration drift proceed as follows:
- You will need a calibration standard and a thermometer.
- Place these two items next to the instrument to be tested so as to ensure that they are all at the same temperature.
- With the instrument turned off for at least five minutes turn it on. Ensure that 0.00 is shown on the display.
- Handling only the yellow end-caps remove the smaller yellow plugs form both ends of the standard.
- Place the sampling nozzle of the instrument into the indicated end - you may need to apply slight pressure to maintain a tight seal
- Take a normal sample from the calibration standard - once the pump has stopped you may remove the standard and replace the plugs.
- Check the temperature and, using the table on the standard, obtain the concentration. Compare this to the reading obtained on the instrument.
- We would recommend re-calibrating if the reading differs by up to 10%.
This procedure is also available as part of this HowTo .
Why does the instrument take more time to 'settle' or 'clear' after taking larger samples?
The nature of the electro-chemical sensor used in the instrument is such that, as a sample of air is drawn into the sensor, the target species reacts and is 'burned' by the sensor to produce a voltage. The more 'fuel' there is to burn the higher the voltage.However, due to the fast reaction speeds and sensitivity of our sensor there tends to be a bottleneck of un-used fuel left in the sensor which has to be cleared before a fresh sample is taken. This is the clearing or settling process required to bring the sensor back to the equilibrium point.
In general the sensor should recover from most concentrations in about five minutes - turning the instrument off for this duration helps as, when the instrument is off, special circuitry is enabled which 'discharges' the sensor as fast a possible. If, after five minutes, the sensor has not cleared then you may have a faulty instrument - see here for more tips.
I've been told that my instrument might perform better in a different 'mode'. What does this mean?
There are three modes of operation available in the latest instruments all of which give better performance - depending on the situation:
| Mode | Setting | Description & Notes | ||||||
| Time Mode | S=t | Reading is taken at the calibration time-to-peak which gives good all-round performance and accuracy. Default setting for most of our instruments. | ||||||
| ADVANTAGES: | •Gives good accuracy in every-day conditions •Corrects for most common chemical interferants •Gives consistent readings |
|||||||
| DISADVANTAGES: | •Depends on accurate calibration •Not suited for high concentration sampling •Very sensitive to sensor time drifts |
|||||||
| Peak Mode | S=P | Original sampling mode of the MkII - simply detects the maxima of the output curve. Ideal for high concentrations or where very little interference is expected. | ||||||
| ADVANTAGES: | •Gives best accuracy for high concentrations (>1ppm) •No post-processing required •Tolerant of sensor time drift |
|||||||
| DISADVANTAGES: | •Not appropriate for high humidity conditions •Poor results with low concentrations •Requires secondary checks by user to check for interference (time-to-peak) |
|||||||
| Area Mode | S=A | Unique sampling technique which selects the appropriate method depending on the ambient conditions. Vastly improves humidity correction and low-level sampling. »»»Only available on htV models««« |
||||||
| ADVANTAGES: | •Inteligent sampling system •Can be factory tuned for each sensor •Excelent stability and improved repeatability |
|||||||
| DISADVANTAGES: | •Slowest sampling method •Not suited for long sample runs •Recalibration required if mode changed |
|||||||
To change the sampling mode of your instrument please contact Technical Support for instructions. Instructions will only be provided if the final application warrants the use of a different mode as changing the instrument settings requires a deeper understanding than can be conveyed here.
What do the different 'limit' settings do?
Different 'limits' tell the instrument the type of sensor that is being used. This then effects the rules used by the instrument to test for a 'clear' state and how to display the results and calculate calibration values.Different rules are required because the different sensors in the range can, for example, have a higher background so need to have a higher allowable 'offset' value. Other sensors may have a slower response time and will need a lower settling gradient.
By having these rules in the firmware we can use the same hardware for most of our instruments and just change the firmware settings. We can also use this setting to change things like instrument range or calibration method.
Is there a way to make the sensor 'settle' quicker?
To understand the 'settling' or 'clearing' process see this question. Also make sure that you have waited five minutes with the instrument turned off before deciding to carry out this procedure - it is not a shortcut and over-use may damage your sensor.To help clear excess 'fuel' from the sensor the user can try to flush out the sensor with clean air. This is particularly useful if a very high concentration sample has 'poisoned' the sensor or if droplets of the target gas have condensed in the sensor manifold. This should only be carried out in clean air such as in a well ventilated room or outside.
In order to 'force' a sample the instrument will have to be operated in a special factory mode which is used to test the sensor functions. Do not be alarmed by any readings you achieve in this mode as they bare no relation to the actual sample concentration.
- With the instrument turned off press and hold the left-hand calibration button while turning the instrument on.
- The LCD display should show the tESt message - release all the buttons.
- Ignore the figure shown on the display.
- Press the sample button to force a sample of clean air into the sensor.
- After a few moments you can press the sample button again to take another sample. Repeat this a few times before turning the instrument off.
- Leave the instrument off for five minutes before turning on normally.
If the instrument still hasn't cleared then repeat the above in a different location to ensure that the air is free from any contaminant. If the condition persists contact Technical Support as your sensor may be damaged.
The pump on my instrument has stuck or sounds 'rough' - can I do anything?
This is a common problem caused by particles being drawn through the sensor and collecting in the pump. The only way to clean the pump is to open the case of the instrument and strip down the pump housing for cleaning - this will revoke any warranty on the instrument. Please return your instrument for servicing.To prevent the build up of particles - particularly if the instrument is being used in dusty or damp conditions - you could try placing a phenol filter on the instrument to trap the particles. These filters will need to be replaced fairly often so as to maintain good airflow.
How does the htV instrument convert from ppm to mg/m 3 ?
The algorithm used by the instrument to perform the conversion is as follows:
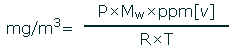
Where...
| mg/m 3 | Concentration in milligrams per cubic meter |
| ppm[ v ] | Concentration in parts per million by volume |
| P | Atmospheric pressure |
| Mw | Molecular weight of the gas being measured |
| R | The ideal gas constant |
| T | Temperature |
Pressure is assumed to be 1 atmosphere. The temperature is obtained from the built in sensor. This feature is only available on the htV model.
My calibration standard has expired - can I still use it and how do I dispose of it?
Never use an expired calibration standard. This is because of two reasons:- The formaldehyde levels in the standard drop after the 6-month shelf life comes to an end or more than 100 samples have been drawn
- Reduced levels mean that bacteria and other organisms may start to grow in depleted tube generating some interfering gases
This means that once a standard is depleted the apparent concentration reading from it may be higher or lower that that expected. This is useless as a calibration source.
Small quantities (less than 5) of depleted standards may be disposed of in the bin as normal waste. If you prefer, you may send the depleted standards back to PPM Technology for disposal - particularly if you have several of them. Please mark returned standards clearly as 'GLASS' on the packaging and 'DEPLETED' or 'EXPIRED' on the standards them selves.
When I use the AMS-2 I get 'bAt' on the instrument screen but the battery is OK?
This is normal - as part of the connection mechanism the AMS-2 needs to fool the instrument into thinking that the battery voltage has fallen below the minimum. This then enables the communication between the two devices.The same effect may be seen when using the older Base Unit and the new SPC-1 interface.
Later models of the instruments will operate without a battery as the instrument is powered by the AMS-2. In this case you will only need the battery to power the instrument during calibration.

